Introduction:
This extension adds super cool features to your application TextBox! You can apply rich formatting, like bold, italic, colors, and add clickable links, among many other things. It even supports adding images and custom menus for selections. ![]()
![]()
Below, you will learn about each feature (function, event, or property) in simple terms. For each feature.
Properties
1. Change Default Text Size
Property Name: TextSizeChange(size: Int)
What it does:
This property lets you change how big or small will text get when you try to change its size in single click.
- Example:

Now when you call

or

It will chane the size by 5px 0 means decrease 5px and 1 means increase 5px (Only selected text)
2. Get Default Text Size
Property Name: TextSizeChange(): Int
What it does:
This propery return the current or default size (5px)
3. Get HTML Template
Property Name: GetHtmlTemplate()
What it does:
This property gives you a pre-made HTML template.
![]()
Functions
1. Show Popup Above the Cursor
Function Name: ShowPopupAboveCursor()
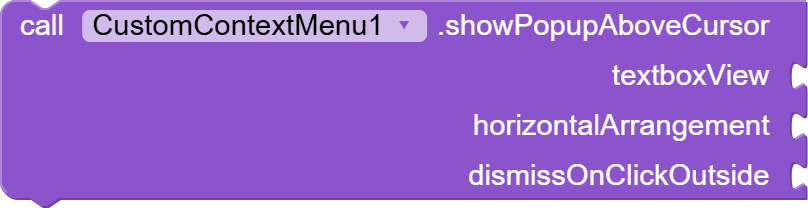
What it does:
This function lets you show a floating “popup” or “menu” exactly above the cursor!
Args
- textboxView : Textbox view in which curser is located
- horizontalArrangement : Horizontal Arrangement which you want to show beside the cursor
- dismissOnClickOutside :
trueorfalseweather to dismiss on outside click or not
2. Hide Popup
Function Name: HidePopupAboveCursor()
![]()
What it does:
Hides the popup window you created with the showPopupAboveCursor() function. Handy when you’re done with it.
3. Get Selected Text
Function Name: GetSelectedText(TextBox: TextBox): String
What it does:
This function finds and tells you the selected text in your text box. Select any text, and this will grab it for you.
4. Apply Formatting to Selected Text
Function Name: ApplyFormattingToSelectedText(TextBox, FormatTask)

What it does:
Changes the look of your selected text! Here’s what each format does:
1→ Bold: Make it bold.2→ Italic: Tilt it slightly.3→ Underline: Add a line under it.4→ Strikethrough: Cross out the text.5→ Subscript: Make it smaller and drop it down.6→ Superscript: Make it smaller and lift it up.7→ Monospace: Change it to look like code!
5. Change Text Color
Function Name: ApplyHexColorToSelectedText(TextBox, HexColor)

What it does:
This function lets you change the color of selected text by passing a hex color code.
6. Modify Text Size
Function Name: ModifySelectedTextSize(TextBox: TextBox, Action: Int)

What it does:
This allows you to increase or decrease the size of only the selected text!
-
Action 1: Increase the size.
-
Action 0: Decrease the size.
-
Why it’s useful: Perfect for emphasizing specific words or sentences.
7. Clear Formatting
Function Name: ClearFormattingFromSelectedText()
What it does:
This function removes all fancy formatting (bold, color, underline, etc.) from the selected text and makes it plain again.
8. Add Clickable Text
Function Name: AddClickableSpanToSelectedText(TextBox, ID)

What it does:
This function makes parts of your text clickable, like a button or hyperlink.
9. Apply Background Color
Function Name: ApplyBackgroundColorToSelectedText(TextBox, hexColor)

What it does:
This function apply the background color into the selected text
10. Insert an Image
Function Name: InsertImageinTextBox(TextBox, ImagePath, Width, Height)
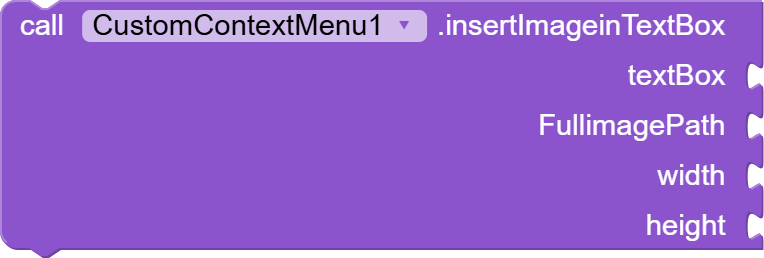
What it does:
This function lets you add a cool image inside your text box. Just choose the image, its size!
11. Blur Selected Text
Function Name: ApplyBlurToSelectedText(TextBox, BlurRadius)

What it does:
Adds a blur effect to the selected text, like you’re hiding a secret!
12. Custom Selection Menu
Function Name: AddCustomSelectionMenu()

What it does:
This function replaces the default selection menu (Cut, Copy, etc.) with your own custom buttons.
13. Export Text (Default HTML)
Function Name: ExportText()

What it does:
This function lets you export your text as HTML. Use this for rich-text emails, web content, or saving fancy formats.
14. Export Text (Custom Template)
Function Name: ExportWithTemplate(TextBox, Template)

What it does:
This function lets you create your own rules (template) for exporting text with custom formatting options. But make sure to follow all the rules else it could cause you some errors here is the template which is recommended to modify rater then creating your own if you don’t know much about it
{
      "bold": {"start": "<b>", "end": "</b>"},
      "italic": {"start": "<i>", "end": "</i>"},
      "underline": {"start": "<u>", "end": "</u>"},
      "strikethrough": {"start": "<del>", "end": "</del>"},
      "textcolor": {"start": "<span style=\"color:%s;\">", "end": "</span>"},
      "backgroundcolor": {"start": "<span style=\"background-color:%s;\">", "end": "</span>"},
      "textsize": {"start": "<span style=\"font-size:%dpx;\">", "end": "</span>"},
      "link": {"start": "<a href=\"%s\">", "end": "</a>"},
      "subscript": {"start": "<sub>", "end": "</sub>"},
      "superscript": {"start": "<sup>", "end": "</sup>"},
      "monospace": {"start": "<span style=\"font-family:monospace;\">", "end": "</span>"},
      "image": {"start": "<img src=\"%s\" alt=\"image\" />", "end": ""}
}
15 Add Layout inside a text box
Function Name: InsertVerticalArrangementInTextBox(TextBox, VirticalArrangement)

What it does:
This function help to add the custom VirticalArrangement into the Textbox just like image. It will add the container into the same position as curser is right now
Events
1. Button Click in Context Menu
Event Name: OnButtonContextMenuClicked(ID, TextBox)

What it does:
Fires when you click a button in your custom selection menu (set up using
AddCustomSelectionMenu()).
2. Clickable Text Clicked
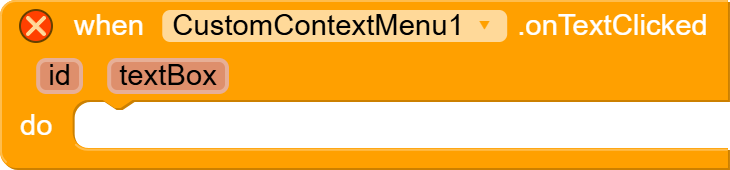
Event Name:
OnTextClicked(ID, TextBox)What it does:
Triggers whenever you click on a part of the text that was set as clickable.
3. Error Handler
Event Name: OnError(Error: String)
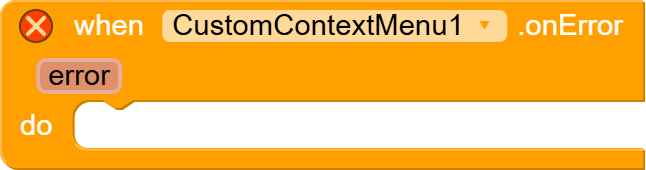
What it does:
Fires whenever the extension runs into an issue, helping you debug your project.
Conclusion
This extension gives your TextBox superpowers—style your text, export it easily, add menus, and even images! ![]() Don’t hesitate to experiment with these features in your next application.
Don’t hesitate to experiment with these features in your next application.
Let me know if you need further clarification or more polished content! ![]()
Download link :
- logicspine.customcontextmenu.aix (1.9 MB) - V1.0 (Beta)
Video Preview :
AIA :
- logicspine.customcontextmenu.aix (1.9 MB) - V1.0 (Beta)
Note :
- Make sure to pass 1 empty data in the
addCustomSelectionMenuwhile creating custom selection menu (Dont know why but if user click on last button it does not work so pass empty button) InsertVerticalArrangementInTextBoxdid not support click inside it so if there is a button or other cliclable component inside it, it will not work (But by usingaddClickableSpanToSelectedTextyou can add the click function in it)